How I Post Process my Fuji RAW Files in Lightroom. Colour.
One of the questions I often get asked is how I post process my images, this blog is going to go over my editing style and a bit about my post wedding workflow.
For me editing is the icing on the cake, it's the final tweeks which make the makes what I want them to be, I tend to take it easy with editing, no heavy edits and almost zero photoshop, I only remove what I think is unfair, so spots and cuts would be unfair, but birthmarks and body shape stay in, that's who people are.
The look I like to achieve is kind of filmic but more than that it is to take the 'digital' look away form the photos, I know I'll never get them to look like actual film stocks but what I like is a bit more subdued colour and a warmer tone than that which comes out of the camera.
Presets
I work with presets almost all of the time, for weddings I batch edit all my shots then make alterations to each image as it needs it, this insures continuity though my work and speeds up the editing process drastically.
My main preset is built off a VSCO film simulation and that is Portra 400 VC++, I've altered this and it's what all my shots have applied upon being imported into Lightroom.
Here's a before and after:
So that's a straight out of camera RAW file, next to a straight up VSCO edit, now my style take this a little further with the following tweeks;
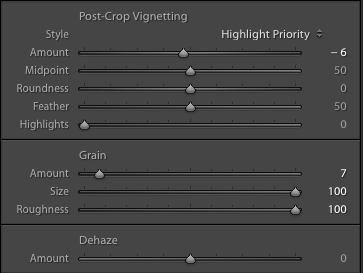
I give it a nice amount of sharpening and a touch of noise reduction, a very slight orange split tone on the shadows to warm things up a bit, a slight bit of vignetting and I alter the grain to be much larger and rougher but not very much of it.
Here's the end result:
So thats it for colour really, I try to get into good light and get my shot as I would like it in camera so I can save time editing and culling the images afterwards. The below images have a few tweeks in exposure and white balance but aside from that it's just the preset.
BEFORE AFTER
RAW; Note the green background tones.
Edited; subtle changes but the green is gone and the skin is a much more pleasing warm tone, the bride also stands out that much more against the now white background.
Below is a shot which needed a bit more work, at this wedding I was I shooting from the hip for a fair amount when I turned around and saw a touching moment between the bride and her father and took the shot, the camera metered for the sky as I was bringing it down and as such it was massively underexposed. Here's the edit:
There are a few shots like the above from weddings where I miss the exposure, it happens, this is one of the principal reasons I shoot in RAW, to not be able to bring this back would be very disappointing for me.
Custom Presets
I always like to experiment with new presets and making my own from scratch, most of the time these don't get used for anything like weddings or paid-for work, but more for my personal stuff and just to develop my own editing skills.
Next weeks blog post is going to be all about black and whites and will delve a little deeper into custom presets and how I go about building one from the ground up, stay tuned.
Cheers,
Col-


